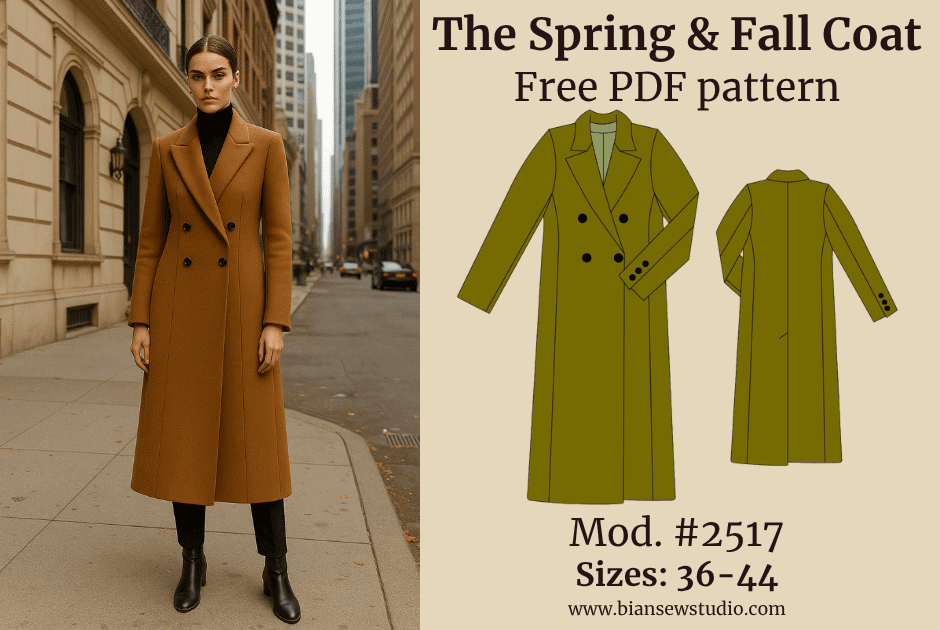
Sewing Techniques: Invisible Zippers

How to Sew an Invisible Zipper – for Beginners

This type of zipper is common in store-bought clothes. If you can’t see it at all once it’s sewn in – not even the seam – it’s an invisible zipper.

Invisible zippers are available in lengths like 22 cm (8 ¾ in), 40 cm (15 ¾ in), and 60 cm (23 ⅝ in). The zipper should be at least 2 cm longer than the opening.
To sew this type, you’ll need a special invisible zipper presser foot – many modern sewing machines come with one. Check your machine’s manual to see if you have it. Instructions usually come with the foot.

How to sew an invisible zipper – flattening the zipper teeth

Use your nail to flatten the zipper teeth and reveal the seam line.

Step 1:

Prep the zipper
Open the zipper and use your thumbnail to press the teeth flat so the seam line between the tape and teeth becomes visible.

How to sew an invisible zipper – pinning the top edge

Zipper top pinned in place with the correct distance from the fabric edge.

Step 2:

Pin the top of the zipper
Place the top end of the zipper on the right side of the fabric.
To position it correctly, calculate:
Seam allowance – 1 cm = distance from zipper edge to fabric edge
Pin the top end of the zipper in place.

How to sew an invisible zipper – using the special presser foot

Zipper teeth go into the right-hand groove of the special presser foot.

Step 3:

Start sewing – first side
The bottom end of the zipper will stick out past the opening – that’s normal.
Place the special presser foot so that the zipper teeth fit into the groove to the right of the needle.

How to sew an invisible zipper – using the special presser foot

Second zipper tape pinned after first side is sewn and closed.

Step 4:

Prep the second side
Sew the first side down to the marked point. Then close the zipper.
Place the second tape of the zipper on the fabric’s right side and pin the top end.

How to sew an invisible zipper – stitching the second side

Zipper teeth now go into the left groove of the foot.

Step 5:

Start sewing – second side
Open the zipper again.
Now place the foot so that the teeth go into the groove on the left of the needle.

How to sew an invisible zipper – finishing the seam

Final seam below the zipper completes the process – the zipper is nearly invisible.

Step 6:

Finish sewing
Sew the second side down. Close the zipper.
Pin the fabric below the zipper, fold the loose end into the seam allowance.
Sew the rest of the seam as close to the zipper stitching as possible.

That’s it! Now you know how to sew an invisible zipper cleanly and confidently!


Include a link to a related blog post or free pattern. Example sentence:

“Want to practice more sewing techniques? Try our free wrap skirt sewing pattern – perfect for beginners!”


Your content already meets most Yoast readability criteria. For the best result, ensure:

  • Short paragraphs (2–4 lines max)

  • Clear subheadings (H2, H3)

  • Use of bullet points or numbered steps when appropriate


Frequently Asked Questions about Sewing Invisible Zippers:

How do I choose the right zipper length?
The zipper should be at least 2 cm (¾ in) longer than the slit you’re sewing it into.

Do I need a special presser foot?
Most modern machines either include it or have one available. Always check your manual.

Can I sew an invisible zipper by hand?
It’s possible, but very difficult. It won’t be truly invisible without the special foot and machine stitching.

Leave a Reply

Related Articles